Thursday 14 March 2013

The Making and Planning of the DigiPak (final design):


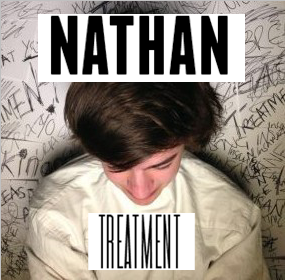
Front Cover of DigiPac:

With the help from Rachel, the plain wall slowly became the background for the front cover of my digipak. It started off with a wad of paper, two black marker pens, a plain wall and some bluetack. To get this background I had to make it. I did this by blue tacking the paper to the wall, then with the help of Rachel, we scribbled all over it, writing down some of the lyrics until it was completely covered.


I then got a spot light and positioned it infont of where the artist would be stood. When he arrived I took a few tester shot photos to check how it looked, then he got changed into his costume and got the main image I am not using for the front cover of the digipak.


Text:

I have chosen 5 possible different styles of text that I might use for the digipak, I would preferably like to use two of these; one for the name of the album, and the other for the artists name.


1.BIG NOODLE

I like this text because its bold and noticeable, my favourite one out of the two is the bottom one because it is slightly slanted and I just think that it looks pretty cool.


2.FRANCHISE

This is very similar to the one above, however, I like this one because the outline of the letters are a lot sharper and defined.


3.REVOLUTION
This text is very spaced out and the letters are very sharp too, I like how the text is bold and clear all at the same time.


4.HEADTHINKER

This is probably my least favourite one because the text is always in lowercase letters and I would preferably like to have the text in capital letters, apart from the fact that again it is very similar.


5.TALLER EVO

This text is completely different as it is skinny and squashed together, yet I personally think that it looks quite good.

I have given my opinions on the different styles of text for the front cover, however it is down to the audience feedback to tell me which they prefer!


Audience feedback on style of text:

To ask the audience I created a little questionnaire and asked them to tick the boxes of their TWO favourite styles of font and then sign their name as proof that it is real audience feedback and not made up.


Audience Feedback/Results:

In total I asked 14 people which their two favourite were and these were the results, there is an example of one of the answered questionnaires below and the final results.


Feedback Breakdown:
1. 2/14
2. 9/14 <<<<<
3. 6/14
4. 4/14
5. 7/14 <<<<<


Fonts 2 and 5 were the chosen fonts so I then did another Questionnaire asking the public which of the fonts looked best as the artists name and which looked best as the album title. Again I got them to put their signatures next to their answers as proof the the audience feedback is real.


In total I asked 10 people and these were the results:


1. 4/10
2. 6/10 <<<<<


Text and Front Cover Together (options):


1.

 2.

3.


I showed the audience all 3 designs, asked them which was their favourite and took a tally down of the results. In total I asked 10 members of the public and these were the results;

1. 5/10 <<<<<
2. 3/10
3. 2/10

Inside/Outside of DigiPac:

I saved a template of a digipac off the internet and used it as a guide to9 help me know where to put everything. 


I then made the background a dark grey colour and put the green line across which is the line on a heart monitor, hence why it is green.


Then I added in the bits which represented the beat and added a green glow around and on the lines to make it look more effective.


This is how it loooked by the time I had added the effect to all of the lines.


I then added on the front cover to see how it looked together and I had to resize the image to fit onto the template.


After resizing the image, this was the outcome!


 I then rotated the DigiPak round so it was upside down and added the text to it, which was the details about the songs, who produced it, who wrote the songs, what different companies helped and about the other artists that he may have worked with. Then the other was the letter from Nathan to all of his fans to tell them how much he appreciates their support and to thank his family too. I did Nathan's name in a different font to try and make it look like a signature.


Back of DigiPac:

I took a picture of Nathan with him sitting in front of a green screen, that way when I uploaded it to photoshop I could select the image of the artist and colour in the rest of the background.


I then added a rectangle


Finished Product:


Codes and Conventions of a DigiPak:

On the front there is the name of the artist and the name of the album. It will have some sort of illustration or a picture of the Artist, the names of the artist amd album is always in big bold font so that it stands out, and the style of the text fits in with the genre/style of the music and the artist's own style aswell.

On the the spine of the album it will have the artist and the name of the album. It also always has a serial code and the record company's name/logo on it.
On the back of the DigiPak it has a barcode which is what all products have, next to this there is sometimes the RRP price of the album and if there is explicit content, it will have a parental explicit contents logo on it. There is a list of the names and the numbers of the songs situated to the top left handside corner (as you look at it) and id there are any special features, extra songs, added on music video etc. this will be added on to the end of the list of songs.
The background of the back cover is normally another picture of the artist posing differently, sometimes in a different location or in different clothing, or if there is just illustration on the front cover, then there is either the same of a different illustraion on the back.

On the inside there is either a continuous background that goes through the digipack, from the left through to the right (as you look at it) or different images of the artist.
There is text inside where the artist may have a written a note to their fans, thanking them for buying the album as well as information about the record company and who has been involved in the process of producing the CD, which is always in every album. Generally speaking, the information of the record is in the middle of the digipak and the note from the artist if they have written one, is on the left. However sometimes, they swap these round.
The right handside is where the CD is held by the digipak, there will either be an image on the CD with the name of the arist and album or sometimes the image that is on the back of the digipak is also the same image as on the CD. If it is not either of these, then the CD might just be a plain colour with the name of the artist and album on it.


Final DigiPak Decisions:

For the front cover I decided that black might seem a bit too dull and dark as the rest of the digi pak is dark as well, I also thought that some of the audience might think it was a bit boring but didn't say anything when asking them about the original designs because I didn't give them the option.
So I have come up with different ideas as to what the background could be and then let them choose.

The choices were:

1. A cream background

I decided on the plain pale background as a choice as it is still dark, but not too dark. This might mean that it will stand out more on a shelf when amongst other albums or digipacs, yet it is still plain and simple and the artist still stands out.


This album cover is similar with the lighting however it is a totally different colour scheme, but the way the light is hitting the artist is what is similar.
 

2. A white paper background with the lyrics of the song scribbled on it scribbled on it

I got this idea from the album cover of Paramore's Riot cover. I thought that it was a different look and the audience might like that because it is unusual.


3. A green background


The last option is the artist in front of a green background that matches the colour of the heartbeat line that will be inside. The audience might like the idea of it all matching together and it might work well all together as it is likely that it will look professional but it is also a unique colour and this is another design that will again stand out.


Digi-Pac Drafts with Audience Feedback:

I designed five front covers for my CD cover of the music single I have used for my music video. After drafting them on a piece of paper I then asked 30 people from my target audience, their opinion on which they prefer and why...


Design 1

10/30 people liked this design best because they were able to see the artists features without the shot being too close like Design 2. -This was useful as i discovered a lot of my audience prefer mid-shots on the front of album covers as appose to a close up because they felt the cover looked too 'crammed'. They thought that being able to see the artists face and features are important as you immediately know who's album it is when on the shelf. I have taken this into account and like the idea of being able to see the artist, so it is likely that I will use this as my front cover, as it was joint most popular with Design 5.


Design 2

Only 1 person out of the 30 people I asked voted this as the best one, the general consensus of opinion was that you can see the artist and you can see him clearly, however the image is 'too close' and doesn't look as effective as the others.


Design 3

Only 2 people voted this cover as their favourite because they thought that you wouldn't be able to see the artist clearly, however, a lot of them also said that they wouldn't choose it as a front cover, but if they had to choose one to be used as the back image of the digi-pac, then that would be their favourite choice as they think that a different shot of the front cover image would be effective (the front cover being a mid-shot and the back being a long-shot). At the time before asking my audience about the front cover, I had not thought about the back of the digi-pac, but now I think that I will take note of what thy have said and use this for the back image. I found the feedback for this CD cover particularly useful, not only because it help me decide on what design to use for the back of the digi-pac, but also because I now know that when I do use it, my audience have chosen it and I like it too.

Design 4

7 out of the 30 liked this design because they thought that it was effective and expressed the artists anger that he experiences in the music video.. They thought that the white plate on the black background was attention grabbing and said that they had 'never seen a cover with something like that on before'.

Design 5

This was the joint favourite with the first design, the audience thought that it was 'simple yet effective' and it had many responses saying it looked 'cool' because it wasn't the same as most covers and it's very rarely that you see a CD cover that isn't the artist posing. The audience said that they liked the effect of the heart beat monitor because it was also dramatic as you can see that his heart has stopped, implying it is broken, which relates to the song.

In conclusion.. I have decided that the first design is going to be the front cover of the digi-pac as it was one of the audiences favourites, not only that, I have also decided that the image inside the digi-pac and on the back will be selected from these designs. This is because the feedback that I collected was that informative and showed many opinions, however they were all similar, which has now made me believe by selecting three of these designs, I will produce a professional looking, eye-catching digi-pac that the public would want to buy if it were on a shelf in a shop!

I have decided that the design I will use for the inside of the digi-pac will be design number 5 which will represent the artists heart flat-lining after it has been 'broken'.
This image will not only be on the inside of the digi-pac but will also be on the CD itself, which will just be a straight line across the CD.
On the the back of the digi-pac I will use design 3, however instead of having the artist in the middle he will be positioned to the left hand-side (as you look at the digi-pac) and the songs will be on the right hand-side (as you look at it).
The digi-pac will open once and then again (as shown on the design diagram below) on the inside of the digi-pac when it is fully open the design will still be the same as design 5 however will have all of the record company's information on the right side (as you look at it) and who the artist wants to thank and his message to his fans on the left.

Digi-Pac Final Design:


First Draft:


The whole of the first part of this video needs re shooting as the whole beginning part is fuzzy because it has too much video noise that makes it look rubbish. I also think the the chair he is sat on looks silly and out of place, so I will re shoot it with him sitting on the floor and rocking because at the moment he looks really bored. Another problem with thyis is that Nathan's lip syncing doesnt fit into the actual record so that needs improving as well, I will do this by getting him to learn the lyrics better than he has done and playing the song loudly so he can hear it clearly.

What I do like about the footage thaat the beginning is the bit where Nathan looks mental. I think this works really well and helps the audience get the jist of what the video and the song is about, so when re-shooting this, I will get him to do exactly the same thing again.

The other parts of the video that I like is the electric shock therapy part where the speed of the shots are fast and then they go a bit slower, it grabs the audiences attention at the point and keeps them engaged in whats happening in the video and wanting to know more about the story line. However, I stupidly forgot to put the shots with Han in because I thought I had already done it, but after looking at them I know that they will look good in the video and I wont need to re shoot those parts that I filmed.

Note: I still need to do is add in the image/footage of the girlfriend faintly on top of the footage of him singing to it, as well as adding in the other shots with Han.

I have used my story board to keep track of what shots need filming again and why they need filming again. I will use these to refer back to when re shooting to remind myself what I am changing, how it needs doing, lighting, positioning, props etc. 


I also kept a log of all the editing that I did with the shots, so that when it comes to editing them again I will be able to look at the sheet and know what I have to do again.

Wednesday 13 March 2013

Diary:

Tuesday 5th February

Today I got most of the shots I planned to get, I got shots; [insert shot no.] I am pleased with the out come and it was a very productive day. Ellie was a great help as she did my hair, make up and some of the camera work, as well as helping with direction after I told her how I wanted the shots of Nathan and I to look. Both Chris and Nathan were great at following the directions given to them and as a result I am really pleased with what I have got, so hopefully I won't have to re shoot any. The rooms weren't fully lit and the lighting was dim to set the right mood, I wanted some video noise in these shots so that it looked hazy which represents how the memories are for the artist.


Thursday 7th February

Today I shot everything I needed and it only took about 20 minutes, however instead of shooting inside the woods I decided to shoot it in the feild just outside because the lighting was better and the sky was gorgeous because the sun was just setting. The lighting was warm which was great because it represented the happy memories but it also created some video noise to give the same hazy look to it.


Monday 11th February

I got every single shot I planned to get today!! However I do not think that the shots of Nathan on his own for the beginning of the video turned out as well as I had hoped and think that I will probably have to re-shoot these when I get chance and Nathan is free again.
The shots with Han do look good but I will have to look at them tomorrow afternoon and when I start editing and see what I think.


Tuesday 12th Februaury

Today I started editing the first draft of my music video. I was correct in thinking the shots of Nathan for the beginning of the music video needed re-shooting, there was too much video noise and it just ended up looking awful, I added the shots into my first draft so I can see how everything will look when I put it all together.
I got quite a lot of editing done today and I will hopefully have finished my first draft by tomorrow!


Wednesday 13th February

Today I successfully completed editing the first draft of my music video! I have decided what I would like to re-shoot and what I will change and adjust. I am pleased with how much I have done so far considering the mix up with who will feature in my video and organising when everybody is free to film.


Friday 15th February

I not only managed to design the drafts of my digipac covers and gather all the audience feedback, I also managed to decide on what my final digipac design would be like because the audience feedback I gathered was so informative.


Monday 18th February

Because I had already finished my first draft I used this day to upload my digipac designs onto blogger and evaluate them, as well as explain my choice for the final design.


Tuesday 19th February

I am planning to use this day to write about my first draft and see what needs re-shooting, doing differently, whether everything fits well together etc.


Friday 22nd February

Today I managed to get most of the filming re-shot and finished, the only shots I am left to get are the shots of walking down the corridoor to the trestment room.


Saturday 23rd February

On Friday during the filming process, Nathan and I fell out and he is now refusing to do anymore filming. I do not have time to find someone else and re-shoot the whole of my video again, so instead, today I came up with different ideas as to what I could do.